4.1 KiB
Executable File
Deploy ASP.NET Core Applications to Azure Container Instances
You can deploy ASP.NET Core applications to Azure Container Instances (ACI) with Docker. ACI is a great option for application testing and can also be used for production deployment (not covered here). These instructions are based on the ASP.NET Core Docker Sample.
Build Application
Build the application per the ASP.NET Core Docker Sample instructions. The following is a summarized version of those instructions. The instructions assume that you are in the root of the repository.
cd samples
cd aspnetapp
docker build --pull -t aspnetapp -f Dockerfile .
For Windows containers, you will need to build with a Dockerfile that uses a Windows Server 2016 image. Use the following instructions for Windows containers:
cd samples
cd aspnetapp
docker build --pull -t aspnetapp -f Dockerfile.nanoserver-sac2016 .
Windows server, version 1709 and later versions are not yet supported in ACI.
Create ACR Registry
Create an ACR registry per the instructions at Push Docker Images to Azure Container Registry. The following is a summarized version of those instructions.
Note: Change the password location and the user account ("rich" and "richlander") example values in your environment.
az login
az group create --name richlander-containers --location westus
az acr create --name richlander --resource-group richlander-containers --sku Basic
Login to Azure Container Registry
First, "admin-enable" your session, an ACR credentials access prerequisite for the subsequent command.
az acr update -n richlander --admin-enabled true
Now login to ACR via the docker cli, an ACR push prerequisite:
az acr credential show -n richlander --query passwords[0].value --output tsv | docker login richlander.azurecr.io -u richlander --password-stdin
Push Image for Azure Container Registry (ACR)
Use the following instructions to tag the image for your registry and push the image. If you automate these instructions, build the image with the correct name initially.
docker tag aspnetapp richlander.azurecr.io/aspnetapp
docker push richlander.azurecr.io/aspnetapp
Deploy Image to Azure Container Instance (ACI)
During deployment, you'll need to enter your password. Type or copy/paste it in. Get your password beforehand from the following command:
az acr credential show -n richlander --query passwords[0].value --output tsv
You can deploy Linux images with the following command:
az container create --name aspnetapp --image richlander.azurecr.io/aspnetapp --resource-group richlander-containers --ip-address public
You can deploy Windows images with the following command, which includes --os-type Windows:
az container create --name aspnetapp --image richlander.azurecr.io/aspnetapp --resource-group richlander-containers --ip-address public --os-type Windows
Note: Azure Container Instances only supports Windows Server 2016 Nano Server and Server Core images, not Windows Server, version 1709 or later.
Running the Image
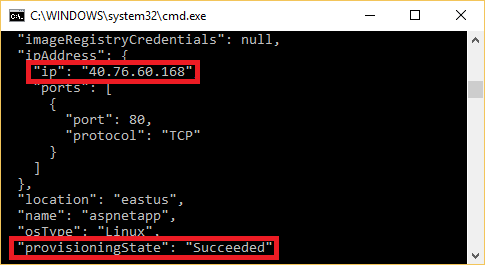
The last step -- az container show -- will need to be repeated until provisioningState moves to Succeeded.
az container show --name aspnetapp --resource-group richlander-containers
Once the provisioningState moves to Succeeded, collect the IP address from the ip field, as you can see in the following image, and then copy/paste the IP address into your browser. You should see the sample running.
Cleanup
When these containers aren't needed, delete the resource group to reclaim all exercise container resources.
az group delete --name richlander-containers
az group exists --name richlander-containers